- October 23, 2025
- - In category: Blog
Dealing with water in your basement can be a real headache. It’s not just about the mess; it can lead to bigger problems like mold or even damage to your home’s foundation. One of the best ways to keep your basement dry is by setting up a sump pump drain system. This guide will walk you through how to install a sump pump drain system, making sure your home stays protected from water.
Key Takeaways
- A sump pump system collects water that enters your basement or crawl space and pumps it away from your house.
- Proper installation is just as important as choosing the right sump pump to prevent future water issues.
- The process involves digging a channel, installing a drain pipe that leads to a sump pit, and setting up the sump pump itself.
- Connecting the pump to a discharge line that safely carries water away from your home is a critical step.
- Regular testing and maintenance are needed to ensure your sump pump system works when you need it most.
What Is a Sump Pump Drain System?
So, you’re dealing with a damp basement or maybe even the occasional flood? A sump pump drain system is basically your home’s built-in defense against water trying to sneak in where it doesn’t belong. Think of it as a plumbing setup designed to keep your basement or crawl space dry. It’s a pretty clever system that works by collecting water that seeps into the ground around your foundation and then pumping it away from your house.
At its core, the system involves a few key parts. First, there’s a trench dug around the perimeter of your basement floor. Inside this trench, a special perforated pipe, often called a drain tile or weeping tile, is laid. This pipe is designed to catch water that collects in the soil near your foundation walls. This is a big part of effective basement drainage solutions.
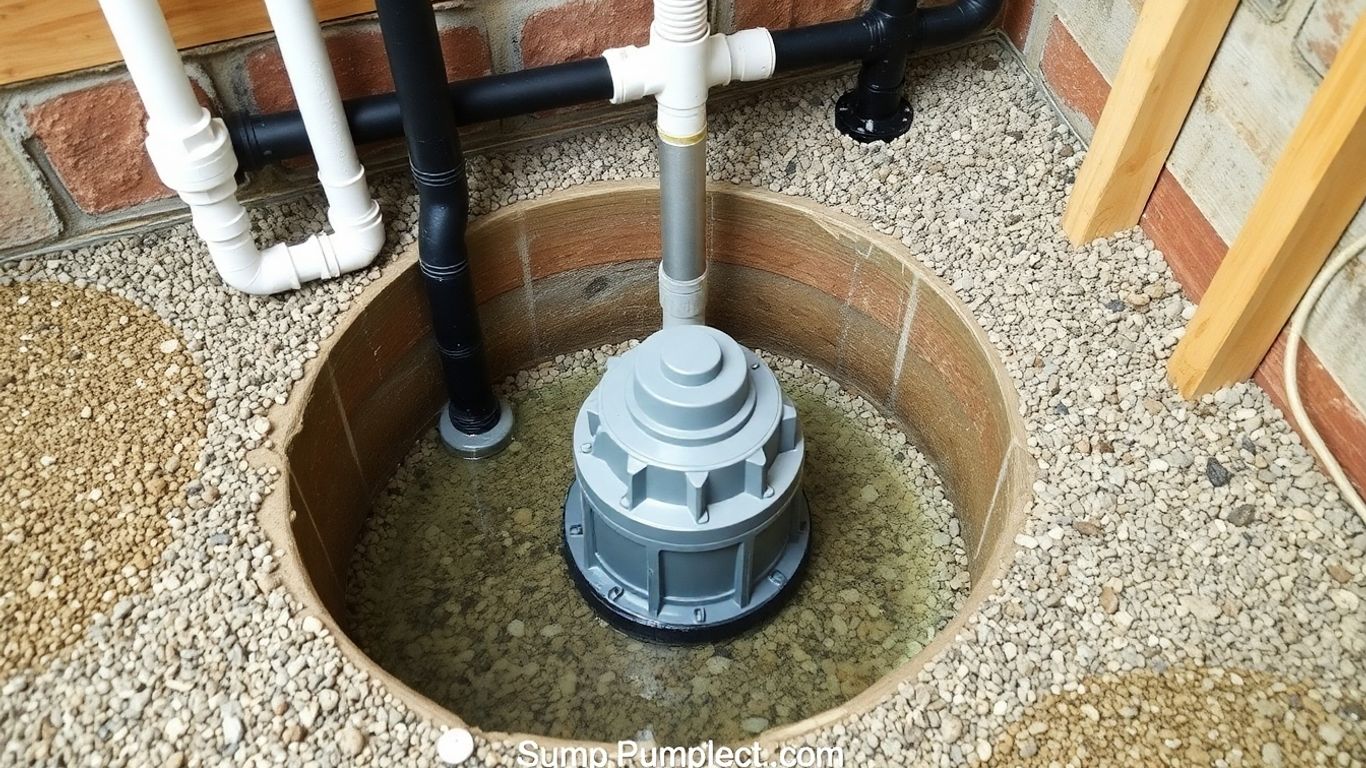
This collected water then flows through the pipe, usually with a slight downward slope, into a sump pit. This pit is essentially a hole dug into the floor, usually with a liner to keep it solid, and it acts as a collection basin. When the water level in the sump pit rises to a certain point, it triggers a sump pump.
The sump pump itself is a small, submersible pump. Once activated, it quickly pumps the water out of the pit and through a discharge pipe, which carries the water far away from your home’s foundation. This sump pump discharge pipe connection needs to be done right to avoid issues.
Here’s a quick rundown of the main components:
- Drain Tile/Perimeter Drains: Perforated pipes installed around the foundation to collect water.
- Sump Pit: A basin that collects the water from the drain tile.
- Sump Pump: A device that automatically pumps water out of the pit.
- Discharge Pipe: Carries the pumped water away from the house.
This whole setup is a major player in waterproofing your basement with a sump pump. It’s not to be confused with something like a bathroom sink drain, which handles a completely different kind of water problem. While some areas might have a basement flooding protection subsidy program to help with costs, understanding the system is the first step.
This system acts as a last line of defense. The goal is to keep water from ever reaching your basement walls in the first place through proper grading and exterior drainage. But when water does get close, the sump pump system is there to handle it.
It’s a pretty straightforward concept, but the installation needs to be done correctly to work effectively. Getting this right can save you a lot of headaches and potential damage down the road.
Why a Good Drain System Matters for Home Drainage
Look, nobody wants to think about water pooling around their house, but it’s a real problem that can cause a ton of headaches if you’re not prepared. That’s where a solid sump pump drain system comes into play. It’s basically your home’s last line of defense against water trying to sneak into your basement or crawl space.
Think about it: heavy rain, melting snow, or even just a high water table can push water towards your foundation. If that water finds a way in, it can lead to all sorts of issues. We’re talking about potential damage to your foundation, mold growth that’s bad for your health, and ruined belongings. It can get expensive fast, and nobody has time for that.
Here’s why having a good system is so important:
- Prevents Costly Water Damage: This is the big one. Water seeping into your basement can ruin drywall, flooring, furniture, and even damage the structural integrity of your home. Repairs can easily run into thousands of dollars.
- Protects Your Health: Damp environments are breeding grounds for mold and mildew. These can cause respiratory problems, allergies, and other health issues, especially for kids and older adults.
- Maintains Home Value: A dry, well-maintained basement or crawl space is a major selling point. Water issues can significantly devalue your property.
- Avoids Emergency Situations: Nobody wants to deal with a flooded basement, especially during a storm. A working sump pump system means you’re less likely to need emergency plumbers services when you least expect it.
A properly functioning sump pump and drain system isn’t just about preventing a wet basement; it’s about safeguarding your health, your belongings, and the long-term stability of your home. It’s a proactive measure that saves you from reactive, expensive repairs down the line. Think of it as part of how you maintain home plumbing systems.
Ignoring potential water issues can lead to problems that require more than just simple drain cleaning services or drain unblocking. Sometimes, you might need extensive plumbing repair services. Having a good sump pump system in place helps prevent these bigger, more stressful situations.
Tools and Materials You’ll Need
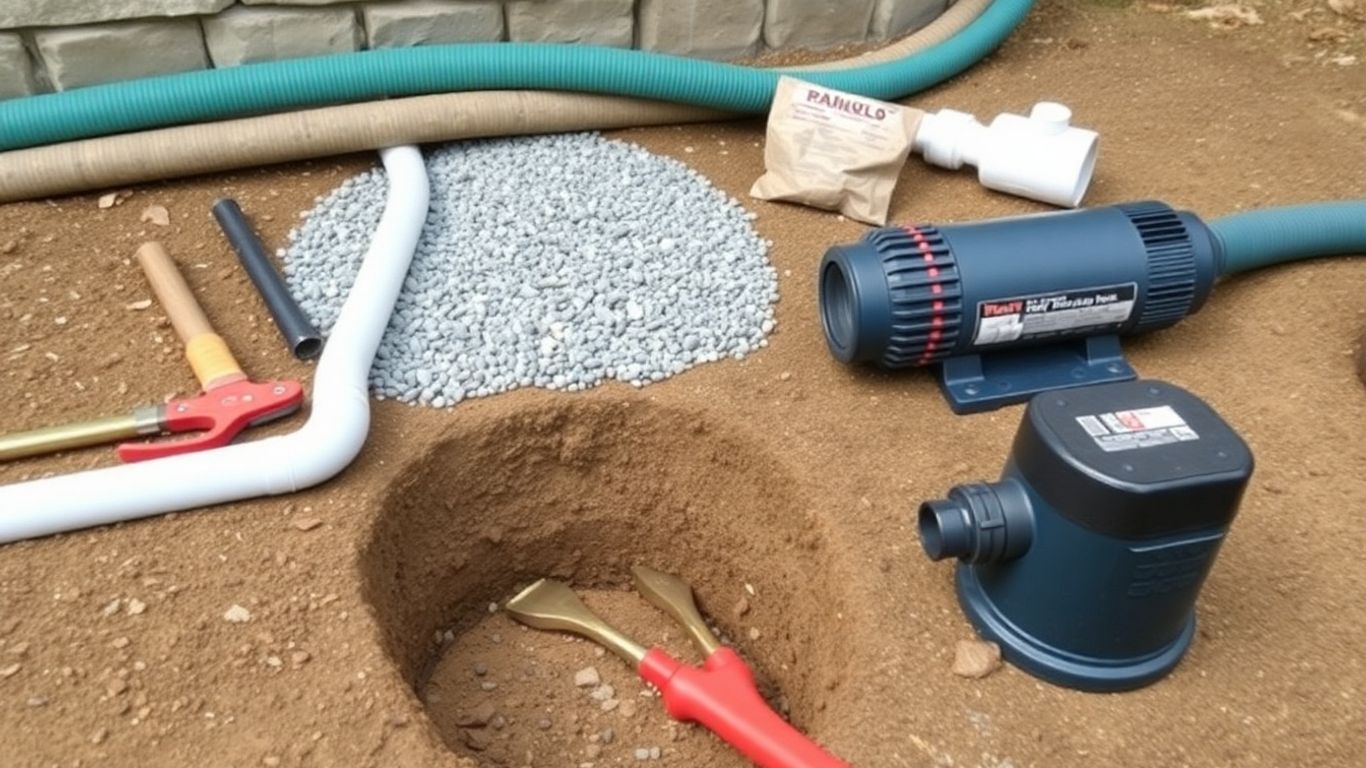
Alright, let’s talk about what you’ll need to get this sump pump drain system installed. It’s not rocket science, but having the right gear makes a world of difference. Having everything ready before you start will save you a ton of headaches.
Here’s a rundown of the essentials:
- Sump Pump: You’ll need a reliable sump pump. Think about the size of your basement and how much water you typically deal with. Submersible pumps are generally quieter and handle more water, while pedestal pumps are easier to access for maintenance. Check the horsepower and flow rate to make sure it’s a good fit.
- Sump Pit Liner: This is basically the basin where the water collects. You can get these in plastic, concrete, or fiberglass. Make sure it’s the right size for your space.
- PVC Pipe and Fittings: You’ll need Schedule 40 PVC pipe (usually 1.5-inch diameter is good) and the necessary elbows, couplings, and adapters to connect the pump to your discharge line.
- Check Valve: This is super important. It stops water from flowing back into the pit after the pump shuts off.
- Gravel: A good amount of clean, washed gravel (about 3/4-inch to 1-inch stones) is needed for the bottom of the sump pit. This helps with drainage and keeps the pump stable.
- Discharge Pipe: This is the pipe that carries the water away from your house. Make sure it’s long enough to reach a safe drainage area, like a storm drain or a downhill slope, and that it’s properly secured.
- Waterproof Sealant: For sealing up any gaps or connections around the sump pit liner.
And for tools, you’ll want to have these handy:
- Shovel or Spade: For digging the hole for the sump pit. If you’ve got a lot of digging to do, you might even consider renting a small excavator.
- Measuring Tape: For getting everything measured out just right.
- Level: To make sure your sump pit and pump are sitting nice and even.
- Drill with Bits: Useful for various tasks, like making holes for wiring if needed.
- Hacksaw or PVC Cutter: For cutting your PVC pipes to the correct lengths.
- Primer and PVC Cement: To securely join your PVC pipes and fittings.
- Adjustable Wrenches and Pliers: For tightening connections.
- Gloves and Safety Glasses: Always protect yourself!
- Bucket and Rags: For cleaning up any water or mess.
- Shop-Vac (Optional but helpful): Great for sucking up any residual water from the pit.
Before you buy anything, it’s a really good idea to check your local building codes. Sometimes there are specific requirements for sump pump installations, like the type of materials you can use or where the discharge pipe needs to go. Getting this right upfront can save you from having to redo work later.
Don’t forget to read the manual that comes with your sump pump. Seriously, it’s got all the specific details for your model, which can be a lifesaver.
Step-by-Step Guide: How to Install a Sump Pump Drain System
Alright, let’s get down to business with this sump pump setup guide. Installing a French drain for your basement might seem like a big job, but breaking it down makes it totally manageable. This isn’t about Sewer Line Repair, but about preventing the need for it by keeping water out in the first place.
First things first, you’ll want to prep your area. This usually means digging a trench around the perimeter of your basement or crawl space where water tends to collect. The trench needs a slight slope, guiding water towards the spot where your sump pit will go. Think of it like creating a tiny, controlled riverbed for unwanted water.
Next up is the drain pipe itself. You’ll lay perforated pipe in this trench. It’s often wrapped in a fabric filter to keep dirt and debris from clogging it up. Then, you’ll cover the pipe with gravel. This gravel layer is important; it helps filter the water as it seeps down towards the pipe. Some folks use different sizes of gravel, starting with larger stones and finishing with smaller ones, to really get that filtering action going.
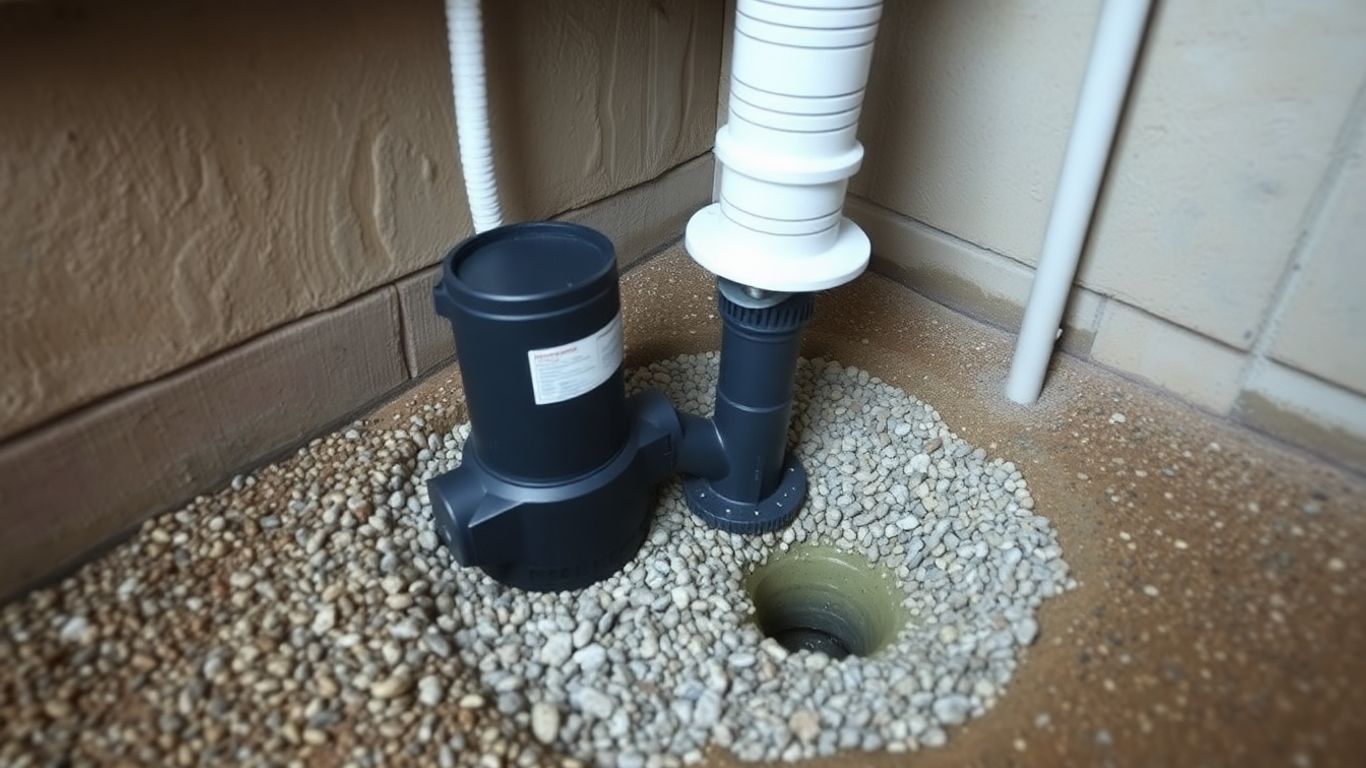
Now, for the heart of the system: the sump pit and pump. You’ll dig a hole for the pit, usually deeper than the trench, and place a liner in it. This is where all the water collected by the drain pipe will end up. Once the pit is in place, you’ll install the sump pump inside. Make sure it’s sitting level on a solid base – never directly on dirt or loose gravel, as this can cause problems down the line. This is a key part of Sump Pump Installation.
After the pump is set, you need to connect the discharge line. This pipe carries the water away from your house. It needs to run from the pump’s outlet, usually through a check valve (to stop water from flowing back), and then outside to a safe drainage area, far from your foundation. Some systems might require drilling through a rim joist to get the pipe outside. This is where a good sump pump setup guide really helps.
Finally, you’ll backfill the trench, making sure the gravel and pipe are properly covered. You’ll also want to patch up the floor around the sump pit. The most critical step is connecting the pump to a reliable power source, ideally on its own dedicated circuit with GFCI protection. This prevents accidental shut-offs and keeps your system ready to go.
Remember, while this guide covers how to install a sump pump drain system, if you encounter unexpected issues or feel unsure, especially if you suspect deeper problems like needing Sump Pump Repair or even considering Pipe Lining for other issues, it’s always wise to consult with a professional. They have the tools and experience to handle complex situations.
Here’s a quick rundown of the process:
- Digging the trench with a slight slope.
- Laying perforated drain pipe and covering it with gravel.
- Installing the sump pit and placing the sump pump inside.
- Connecting the discharge line with a check valve.
- Connecting the pump to a dedicated power source.
Getting this right means your basement stays dry, which is a huge win for your home’s health and your peace of mind. For more details on the actual pump connection, check out this sump pump installation process.
Common Installation Mistakes to Avoid
Putting in a sump pump system seems straightforward enough, but a few slip-ups can turn a good idea into a real headache. Let’s talk about what can go wrong.
One of the biggest blunders people make is skipping the local building codes and permit process. Seriously, don’t do this. These rules are there for a reason, usually to make sure your setup is safe and won’t cause problems for you or your neighbors. Ignoring them can lead to fines, having to redo the work, or even worse, safety hazards down the line. Always check with your local municipality about what’s required before you even pick up a shovel.
Another common pitfall is improper pit placement and sizing. You want the pit to be in the lowest part of your basement or crawl space so water naturally flows to it. If you put it in the wrong spot, it just won’t collect water effectively. Also, make sure it’s deep and wide enough to handle the amount of water you might get. A pit that’s too small will just fill up and overflow, defeating the whole purpose.
Here are a few more things to watch out for:
- Incorrect discharge line setup: Make sure the water has a clear path away from your foundation. If the discharge pipe is too flat, has too many sharp bends, or empties too close to your house, water can back up or freeze.
- Ignoring electrical safety: Sump pumps need power, and messing with electrical wiring in a damp basement is risky business. If you’re not comfortable with electrical work, hire an electrician. A poorly wired pump can be a fire hazard or just not work when you need it most.
- Not testing the system: After everything is hooked up, you’ve got to test it. Fill the pit with water and make sure the pump kicks on, discharges the water properly, and shuts off. A quick pressure test can also reveal leaks in the piping.
Sometimes, what seems like a simple DIY project can get complicated fast. If you’re unsure about any part of the process, especially the plumbing or electrical aspects, it’s way better to call in a professional. They’ve seen it all and can get it done right the first time, saving you potential headaches and costly repairs later on.
Professional Installation vs. DIY Setup
So, you’re thinking about tackling the sump pump drain system yourself, huh? It’s definitely a tempting thought, especially when you see those DIY videos that make it look like a breeze. And hey, for some folks, it might be totally doable. If you’re handy, have the right tools, and a good chunk of time, you could pull it off.
But let’s be real, installing a sump pump system isn’t quite. It involves digging, plumbing, and electrical work, all of which can get messy and complicated fast. Getting it wrong can lead to bigger problems down the road, like leaks or the pump not working when you need it most.
Here’s a quick look at what you’re up against with each route:
- DIY:
- Pros: Saves money on labor, sense of accomplishment.
- Cons: Time-consuming, requires specific tools, risk of errors, no warranty on labor, potential for code violations if not done right.
- Professional Installation:
- Pros: Done right the first time, saves you hassle, often comes with a warranty, professionals know local codes, access to better equipment.
- Cons: Costs more upfront.
When you hire a pro, you’re not just paying for their time; you’re paying for their experience. They know how to properly connect everything, make sure it’s up to code, and they usually offer a guarantee on their work. Plus, they’ve probably seen every weird basement setup imaginable and know how to handle unexpected issues.
If you’re not super confident with plumbing and electrical work, or if your basement has some tricky quirks, it’s probably worth calling in an expert. Think about it – a little extra cost now could save you a lot of headaches and money if something goes wrong later.
Maintenance Tips for Long-Term Performance
Keeping your sump pump system in good shape means it’ll be ready when you need it most. Think of it like giving your car an oil change – it just makes sense to do it regularly.
Regularly test your sump pump by pouring a bucket of water into the pit to make sure it kicks on and pumps the water out. This simple check can save you a lot of headaches down the road. Also, take a peek at the discharge line; you don’t want any blockages stopping water from getting where it needs to go.
Here’s a quick rundown of what to keep an eye on:
- Check the Pit: Make sure it’s free of debris like dirt, gravel, or anything else that could clog the pump. A clean pit is a happy pit.
- Inspect the Pump: Look for any signs of wear and tear, corrosion, or damage. Listen for any strange noises when it runs – that could mean something’s not quite right.
- Test the Float Switch: This is the part that tells the pump when to turn on and off. Give it a gentle nudge to see if it moves freely and activates the pump.
- Examine the Discharge Pipe: Ensure it’s clear and that water is flowing out freely away from your home. Check for any cracks or loose connections that could lead to a leak repair situation.
Sometimes, you might notice a small amount of water around the pump or fittings. While minor seepage might not seem like a big deal, it’s worth investigating. Persistent dampness or visible water could point to a developing leak repair issue that needs attention before it gets worse. Catching these small problems early can prevent bigger, more expensive repairs later on.
Don’t forget to check your home’s foundation and basement walls periodically for any signs of moisture. Damp spots, water stains, or a musty smell could indicate that your sump pump system isn’t handling water as effectively as it should, or that there’s another water entry point you need to address.
Conclusion
So, you’ve gone through the steps, gathered your gear, and hopefully, you’ve got a working sump pump drain system in place now. It’s a pretty big job, and honestly, it’s one of those things you don’t think about until you really need it. But having one installed means you’re doing a lot to protect your home from water damage, which can get seriously expensive and messy.
Remember, this system is like your home’s last line of defense against water trying to sneak into your basement or crawl space. It’s not just about heavy rain; snowmelt and even just groundwater can cause problems over time. By getting this system set up, you’re giving yourself some serious peace of mind.
Here are a few things to keep in mind moving forward:
- Regular Checks: Don’t just forget about it after installation. Give it a look-over every few months, especially before and after big storms.
- Clear the Area: Make sure the sump pit stays clear of debris. Leaves, dirt, or anything else can clog it up and stop the pump from working.
- Test It Out: Periodically, you can test the pump by pouring some water into the pit to see if it kicks on and drains properly.
Installing a sump pump drain system is a smart move for any homeowner worried about water issues. While it might seem like a lot of work upfront, the protection it offers your home’s foundation and interior is well worth the effort. Think of it as an investment in your home’s long-term health and value.
If you ever feel unsure about maintenance or notice something seems off, don’t hesitate to call in a professional. They can spot issues you might miss and keep your system running smoothly for years to come. Happy draining!
In conclusion, if you’re facing any plumbing issues, big or small, don’t hesitate to reach out. We’re here to help you get your home back in working order quickly and efficiently. Visit our website today to learn more about our services and schedule an appointment!
Frequently Asked Questions
What exactly is a sump pump drain system?
Think of a sump pump drain system as your home’s underground water management crew. It’s a setup that collects water that might seep into your basement or crawl space and pumps it safely away from your house. It usually involves a special pit (the sump pit) where water gathers, and a pump that kicks in to send the water outside through a pipe.
Why is having a good drain system so important for my house?
A solid drain system is like a bodyguard for your home’s foundation. Without one, water can build up, leading to damp basements, mold growth, and even damage to your home’s structure over time. It helps keep your basement dry, your air cleaner, and saves you from potentially costly repairs down the road.
What kind of tools and materials will I need to install this system?
You’ll likely need tools like a shovel or trenching tool, a saw for cutting pipes, a drill, a level, and possibly a jackhammer if you need to break up concrete. Materials often include drain pipes (like PVC), gravel, a sump pit liner, a sump pump, and fittings to connect everything. It’s always a good idea to check the specific requirements for your chosen system.
Can I really install a sump pump system myself, or should I hire someone?
While some handy homeowners can tackle a DIY sump pump installation, it can be a pretty involved job. It requires digging, working with pipes, and electrical connections. If you’re not comfortable with these tasks or don’t have the right tools, hiring a professional basement waterproofing specialist is often a safer and more reliable bet to ensure it’s done correctly.
What are some common mistakes people make when installing these systems?
Some common slip-ups include not digging the trench with the right slope for water to flow, using the wrong size or type of pipe, not sealing pipe connections properly, or placing the sump pump directly on dirt instead of a solid base. Another big one is not making sure the water is discharged far enough away from the house.
How often do I need to check on my sump pump system?
It’s smart to test your sump pump regularly, maybe once a month or before big rainstorms, to make sure it’s working. You can do this by pouring some water into the pit to see if the pump turns on and pushes the water out. Checking the discharge pipe for any blockages is also a good idea.
